Home

Wednesday, April 12, 2017

Backyard Project: All in One - Deer Fence/Gate/Wall

Part of the deer fence is made from punched metal.

The punched metal sheet and cedar boards make an 8-foot high wall from the house and across the east side of the propagation room.

A railing has been installed on the wall. It holds a slider...

...to support a sliding gate to fill the gap in the deer fence.

The holes in the metal allow for ventilation of the propagation room. Air flow will inhibit the growth of moulds on the plants sitting on the propagation table.
It also acts as a veil partly obscuring the view of the garden until the gate is opened.
The famous British garden designer, John Brooks, says 'garden entrance gates are the most important elements of a garden.' They need to be simple and they need to make sound use of materials to provide a firm, dry access to the garden. 
The fence and gate needed to be large in size and built of solid materials to balance the massive rock boulders of the raised garden beds seen on the other side of the garden. The rocks were quarried locally and the fence is made from the same sort of trees that grow in the forest. It is important that a sympathetic barrier is built of local materials.
This gate and fence with the studio building together pull the house and backyard into a single unit forming a protected courtyard separated from the forest. 
The Japanese have made an artform of barriers and they consider the two faces of a fence, inward and outward, and the aesthetic quality of each side is determined by needs and desires. Looking from the outside in towards the sunlit garden one has the feeling of being invited inside. While looking from the inside out towards the low light under the forest canopy the metal fence appears dark and the solid barrier is comforting. 
This gate-fence boundary also provides privacy for the guest patio - more on that in a later post.
While it is an 8-foot barrier to keep deer out of the garden, it is unlikely to stop racoons because they will be able to climb up and over it. I don't think it will keep determined cougar or bear out either.
The next problem we are searching for a solution to is a simple but secure catch and handle for the sliding gate that can be easily accessed from both sides. This is proving to be not as easy to solve as it sounds.


Monday, April 10, 2017

VISDA Current Threads 2017 Exhibition in Ladysmith BC

The annual Vancouver Island Surface Design Association Currents Threads exhibition will open on April 15 and run until April 30, 2017.
This year the group is returning to the Ladysmith Waterfront Gallery, Ladysmith. 
All of the work will have been completed in the last 3 years and has not been shown in any Current Threads exhibition before.
We are anticipating another successful exhibition with many visitors.
The Artist Reception is on April 22, from 2:00 until 4:00 pm. I do hope many of you can attend to enjoy the work and talk to the artists in attendance.
Artists will be sitting the gallery every day from 11 am until 4 pm.
During Ladysmith's Spring Art Tour on April 21st until 23rd, the gallery hours are extended from 10 am until 5 pm.
This annual exhibition is a survey of the most recent work by fibre artists who live on Vancouver Island and many of the smaller offshore islands.
You are all invited to attend.

Thursday, April 6, 2017

New Work: 2 new works on the go

Every day I am in the studio I stitch into this work for an hour or so.

After the tree added its wind drawing I am responding by marking the branchlets I see on the ground after the wind.

I am also working on another for the Synesthesia series.

This series is a response to how I feel about the energy of each colour.
I show the energy through line, value and a fibre art technique.
For this colour, it is cut-back applique and free motion machine embroidery.

A check on the values.
 Is there enough contrast or is there too much contrast? 
Are the darks and lights in the right places to give the feel I want?
I am making 24 in this colour series

Monday, April 3, 2017

Backyard Project: Installation of Electricity and Paper Barrier

The electricians arrived. They asked me lots of hard questions. They couldn't get to work until I had given them logical and sensible answers to all of their questions. Since this project started 3 years ago I have come to realise I am not very good with planning lighting on paper. I need to be in the space and imagine how I will be working in it and moving around. The electricians needed to know what sort of lights and where would the switches go? Take this light at the apex of the roof, will it have a motion sensor to turn it on or will there be a switch somewhere outside the area so I am not walking into the darkness?

How many power outlets do I need above the potting bench? I had to think about what sort of equipment I will be using before I could answer.

The power comes from the power box on the side of the garage along lines strung across the inside of the walls.

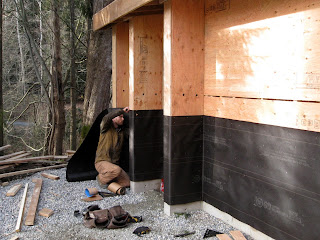
In the meantime, Josh is stapling the black paper barrier to the walls.


The fascia boards have been nailed in place.

Now the electricians have been all of the remaining plywood can be nailed in place.

Plywood is nailed to the walls inside the sheds.

These are the finished walls and ceiling in the shed. We had this finish installed in the studio crawlspace and have been very pleased with how functional it is. There is no maintenance except for a sweeping off of cobwebs once a year. It fits with the industrial look we are going for.


Friday, March 31, 2017

Backyard Project: 2 Sheds With 1 Roof - Naming the Spaces

If you have been following the construction of this building you are likely to have been confused about its configuration. 
Naming the Spaces
Looking at the potting area

Looking at the doorway to one shed and where firewood is to be stacked

Looking north, the building is tucked in behind the garage

Looking at the entrance to the 2nd shed and the space for shelving

Potting area on the left, project bench on the right

All under one roof. View looking south-west.
The north wall of the garage and this roof are part of the deer fence/barrier. I'm not convinced the deer won't try to leap up onto the roof and then jump down into the shed area. People reassure me they won't. Hmm...


Now the plywood is in place it is easier to see the spaces.
Shed doorway with firewood storage on the right.

Back shed with a storage area where the orange ladder is leaning.
Is it clear now how the different spaces fit together?


Wednesday, March 29, 2017

Backyard Project: 2 Sheds Starting to Take Shape

The framework for the 2 sheds is coming along.

Another delivery

Sheets of plywood (left), roof beams (bottom right), fascia boards (top right).
I had to ask to be able to tell you that.

The first lot of plywood is nailed in place to make the west wall.

Josh hoists up the first roof beam and puts it in place - on a very wet and cold day.

Now all of the roof beams are in place. 
The building is really taking shape now.

Monday, March 27, 2017

Backyard Project: 2 Structures Starting to Look Real

Structure #1 The Shed Area. Foundation/Retaining Wall on north side
Just before we went away for Christmas the Shed site had been blasted, dug out and levelled off. Footings had been framed up, poured, framework removed, then covered up with backfill. Foundation walls had been framed up, poured then the framework removed. Gravel was spread over the area to smooth the ground and to provide an even work surface. The gravel hid a lot of the hard work that had been done.

The first wall frames were a welcome sight.

Looking south into the back of the power tool shed.

Structure #2 Propagation Room
This indoor-outdoor room supports a roof easily accessed from the upper level of the house. I walk from my office/library through this transition room outside and along the path to my studio.
The lower propagation table frame is in place.

Electricians came and installed wiring for lights.
It is time to make yet another decision - what sort of light fixtures? 
Grow lights in a propagation room?

Outside the deer fence looking in at the Propagation Room.
The wall of punched steel will allow air to flow freely around the plants.

View from the Propagation room out to my studio.
There is still a lot of work to do but it feels as though things are starting to come together.

Wednesday, March 22, 2017

New Work: Responding to Trees with Stitch

This work began with a cloth that was buried in the soil beside a Douglas-fir tree. Before the cloth began to decay I dug it up.
It was now my turn to respond to the cloth. 
I liked the bits of leaves stuck to the cloth so stitched over some of them to hold them in place.
Now it was the tree's turn to respond. 
When the cloth was dry I stretched it on a hoop and waited for a windy day. When that day arrived I raced out and tied a little paintbrush to the end of a branch. I dipped the brush into a bottle of ink then held the hooped cloth up to the brush. While the wind blew the branch around the ink-filled brush drew on the cloth - a wind drawing.

Now it was my turn to respond again.

It was time for me to add more stitch to respond to the tree's wind drawing.
The cloth needed a backing to support the stitching I had in mind.
I selected a bedsheet stained during its time wrapped around the trunk of the tree.

I found another unstained bedsheet to give a firmer cloth to stitch into.

I trialled different bedsheets to get enough contrast between the 3 cloths. Even though the colours are soft and subtle, contrast between the different cloths is still needed. 
I used my camera to take black and white photographs to check the value contrast between the different sheets before I settled on this combination.

I wanted to show the little branchlets that break off the Douglas-fir tree during a wind storm.
I went though my large bin of 'white' thread to find just the right ones.
I went outside to find one of these branchlets and made lots of drawings of it until my hands knew the angle at which the needles came out of the branch.
Next, I stitched some samples, trialling different stitch combinations. I settled on a made-up version of couching though no doubt someone somewhere has invented this stitch before. I call it a long-armed couching stitch.
Now I have to settle down and stitch every day to make sure I keep the rhythm going and keep remembering my intention with this work.

Monday, March 20, 2017

James Bond Hotel Amalia Delphi by Nikos Valsamkis

When the family checked into the Amalia Delphi Hotel in Delphi here, while touring Greece early this year, the 20-somethings commented we had walked into a James Bond hotel. 
Built in 1964 in the mid-century modern style the owners have recently renovated staying true to the architect's design so it did indeed look like a James Bond movie set.

The architect Nicos Valsamakis more of his designs here has been called 'the most important Greek architect of today.'
The above image taken in the hotel's lounge shows some of his signature moves: cut outs through walls, usually rectangular in shape, mixing the old/traditional - a Byzantine style icon - with the new - beside the icon there is a framed contemporary weaving by a Greek artist.

The huge lounge is divided up into many small areas defined by different collections of comfortable furniture. Unlike many hotel communal rooms, this room was in continual use by the guests.

The lounge in the bar was more intimate with smaller groups of chairs in warmer colours.
This time the rectangular wall cutout is filled with a fireplace and wood storage.
The blue-grey slate floor tiles in the common areas contrast with the brighter colours in the furniture with a predominance of orange complementing the blue floor.


One of the most striking features of the hotel is the play of material textures and colours. Here a cool coloured, rough stone wall butts up against a warm coloured finely crafted wood and steel wall.

The hallways to the rooms have a rough stone wall on one side contrasting with a smooth white one on the other side while the floor is made of large roughly hewn but smooth stone blocks like many of the stone paths we had walked on all day while exploring Delphi historic sights. I had the feeling I was walking on the bedrock of the mountain the hotel was built into.
The unadorned walls in a muted neutral pallette emphasise their contrasting textures

Tucked into recesses in the white wall is a smooth soft green wall with barely visible entrances to the rooms, softly lite by rectangular shaped overhead lights. One's room felt discrete and private even before entering it.

A tranquil outside garden off the bar lounge is entered by walking on a string of stones across a koi-filled pond.

The grass and shrub filled, flat, green roofs were way ahead of their time. But this 1964 design may be referencing a feature of traditional Greek architecture.
The hotel snugs comfortably against the mountain-side blending in seamlessly and is surrounded by its 35 acres of gardens.
I spent a lot of time observing how the guests used each space. Every area was so often alive with quiet activity - some finding a quiet spot to read, a relaxing place to share a drink with friends, a large enough space for a family gathering.
What a treat it was to stay in such a well-designed building and to have the time to observe it how well its spaces functioned. I will be on the lookout for more of architect Nicos Valsamakis's creations.